Polar Graphs
by: Maggie Hendricks
This Instructional unit is designed to be implemented over the course of three-four days of 90 minute class meetings. It should be noted that the work here could be extended in such a way as to be used for a week or more of class if needed. It is based on standards associated with a GPS Accelerated Math III course. The details and/or layout can be modified as needed to fit the different needs of another course or class duration.
The plans and activities for this unit are designed to give students an introduction to working with polar graphs. By the end of the unit, students should be able to work comfortably in the polar plane, recognize and understand polar equations, plot coordinate points and/or basic graphs in the polar plane, and explore common polar graphs (i.e., lines, circles, cardioids, limacons, and roses). On the first day, students will be introduced to the polar plane, specifically in reference to using r and theta instead of x and y; they should become familiar with plotting points and simple functions (lines) as well as being able to transition between rectangular and polar notation. On the second day, students will begin to explore polar graphs of circles, roses, limacons, and cardioids; they will do this by looking at characteristics associated with both the equations and graphs of the different shapes. The third day is designed to be a summarizing day, and students will spend the day working through an assessment project of sorts that will tie together the ideas they have been introduced to. See the detailed outline below for the specific lessons associated with each of the three days.
Day 1: Introduction to the Polar Plane
By the end of today’s lesson, students should be able to:
- Work comfortably in the Polar plane
- Understand the relationship between r and theta
- Recognize and understand polar equations
- Easily transition from polar to rectangular form, and make connections between the two
GPS Standards:
MA3A13 Students will explore polar equations.
a. Express coordinates of points in rectangular and polar form.
Required Materials:
- Graphing calculators
- Student computers with internet access
Begin the lesson with the discussion of what a coordinate point is (i.e., what it represents, what it tells us, etc.)
Students should be aware that a coordinate point, such as (2,3), tells you a location in reference to the origin (0,0). They should also know that the first number corresponds with the distance from 0 along the horizontal x-axis, and the second number corresponds with the distance from 0 along the vertical y-axis.
Once a firm grasp of what a coordinate is has been established, as the students about how they give directions in real life. Be sure to make the point that typically we don’t say “go to the right 8 miles and then to the left 2”. Rather, we typically give directions in the form of “15 miles northeast” that associates a distance with a particular direction. From here, a connection to the underlying basis of the polar plane can be made. At this point, it would be helpful to show students the polar plane. Have them compare and contrast the polar plane versus the coordinate plane, and then talk about some of its main characteristics (i.e., the circles and lines).
Note: Students should understand that the circles represent r, where r is the radius of the circle (or distance), and the lines represent theta, where theta is the angle measure (or direction) from a reference point zero.
At this point, students should be prepared to begin thinking about how to rewrite a coordinate point in terms of r and theta. Note that students should have worked with the unit circle as well as the complex plane prior to this, so they should know how to represent x and y in terms of r and theta. If they are struggling, take a point on the coordinate plane and connect the point to the origin and the x axis, forming a right triangle. Using the Pythagorean theorem, students should arrive at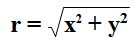 and
and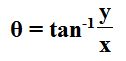 . Additionally, through a bit more work with the unit circle and/or knowledge of right triangle trigonometry, students should be able to arrive at
 and
and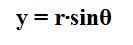 .
.
Ask students whether they think coordinate points in the Cartesian Plane are unique. Compare this answer to whether they think polar points are unique. Students should understand that coordinate points are unique, because each point only represents one location on the coordinate plane, but polar points are not unique, because there are infinitely many ways to name a point on the polar plane.
After this guided discussion/lesson students should have an understanding of the relationship between r and theta; if they are struggling, remind them of the relationship between x and y in the coordinate plane. Using the practice guide, which can be found by clicking here and a graphing applet (like desmos.com), students will work on problems that require them to convert from rectangular form (x, y) to polar form (r, theta). In addition to the practice, there are also directions for the students to follow which will lead them in exploring simple equations (r = a number, theta = a number, and lines/circles). Note that students should graph the given equation using a graphing calculator, then rewrite the equation using the known relationships between x, y, r, and theta. Finally, students should graph the newly rewritten polar equation using a graphing applet to see that they produce the same picture as the original equation.
In closing, review the practice to ensure students are comfortable in the polar plane and can transition between rectangular and polar form. Then, ask students to write in their own words the similarities and differences between rectangular form and polar form. This can include algebraic representations, description of relationships, graphical differences, etc.
Day 2: Characteristics of Common Polar Curves
By the end of today’s lesson, students should be able to:
- Identify the characteristic of circles, roses, cardioids, and limacons
GPS Standards:
MA3A13 Students will explore polar equations.
b. graph and identify characteristics of simple polar equations including lines, circles, cardiods, limacons, and roses.
Required Materials:
-Graphing Calculators
-Student computers with internet access
Begin the second day’s lesson by looking at the two basic forms of a polar curve (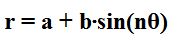 and
and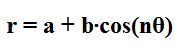 ). Discuss the difference between r and theta and a, b, and n. Students should understand that r and theta are variables (the values vary to locate different points that satisfy the function) while a, b, and n are parameters (these numbers determine the function). Have students open up a graphing applet (like desmos.com) and be sure that students are familiar with how to see the parameters a, b, and n are located and/or how to use a slider to represent the parameters. Once students are familiar with the basics of the graphing applet being used, have them begin the guided practice (which can be found by clicking here). In this activity, students will explore the affects a, b, and n have on the polar curves. Students will use a graphing applet and take one curve at a time. Each curve will have different boundaries for a, b, and n—these determine which curve it will make. After graphing each of the curves, students need to answer the questions that follow. In closing for the day, have a class discussion about the major properties and characteristics of each of the main graphs explored during the activity. As questions arise, refer back to the graphs as well as the equations.
Note: The activity for the second day of this unit is rather extensive, and it may require students to spend two full class days working on it and discussing it. Teachers should be aware of this, and plan accordingly should the need for an extra day arise.
Day 3: Putting it All Together
The third day of this unit should be reserved for a summative project that will assess students based on the following objectives:
1. Students should exhibit familiarity and understanding of the polar plane and its connections to the Cartesian plane.
2. Students should be able to apply their knowledge to new situations.
3. Students should use technology appropriately to show mastery of the standards.
4. Students should be creative and original in their designs and explanations.
The assessment that can be found by clicking here is broken into two parts. The first section requires students to use what they have learned in this unit to answer various questions in their own words. In order to keep this from being a repeat of any activity or discussion from class, the students are required here to extend their learning to new situations and reflect back on the progress they have made individually. For the second section of the assessment, the students are given a chance to take their knowledge and learning from this unit and apply it in a more creative and extended way. It incorporates the use of technological tools that students used in this unit, and it asks them to use the tool in a way that demonstrates both their capabilities with the tool and their understanding of the mathematical concepts.
Click here for a key to the summative assessment provided, and click here for a possible grading rubric for teacher use.
Click here to return to Maggie's homepage.